[ad_1]

Making a Graham Cracker house is a fun way to celebrate the holidays with the kids. Try this toddler Christmas activity as a fun “snacktivity” with the littles—and prepare to have some messy fun!

Graham Cracker Houses
We’ve been making these graham cracker houses ever since my oldest kiddo was a toddler and it’s become a yearly tradition that we look forward to each December. We typically invite 2-4 friends over and make it a playdate!
TIP: I love using natural decorations so the kids can have a mostly healthy snack as they make their house.
An Easy Gingerbread House Idea
Using graham crackers as the base of your house is a super easy way to construct the houses since there’s no baking required. Each house takes about 5 minutes to make and you can make a few ahead of time so they’re ready to go when you’re ready to do the holiday activity with the kids.

Ingredients in Graham Cracker Houses
To make these houses you’ll need:
- Graham crackers
- Glue gun and glue sticks
- Serrated knife
TIP: Buy more graham crackers than you think you will need since some will likely be broken! In my experience, Honeymaid may be a little less likely to be broken in the packages than store brands though that will for sure vary.

How to Make Graham Cracker Houses Step-by-Step
Here’s a look at how to construct your house. Scroll down to the bottom of this post for the full information.
- Heat up the glue gun and stick. Make a box starting with one long graham cracker as your base. Glue on sides and a top.
- Add two long graham crackers to make a pointed roof.
- Cut 2 square graham crackers (either break a full size one in half or pick up a box of the square graham crackers) into triangles with a serrated knife.
- Glue triangles to the ends to finish.
TIP: You can make the houses the day before you plan to decorate the houses if desired.
Can I make these on a milk carton?
We’ve done that in the past, but I’ve found that not all milk cartons are the same size and the only ones we can find at our local store are wider than the width of a graham cracker—so it actually doesn’t make it any easier. We like to make slightly bigger houses with glue and graham crackers.

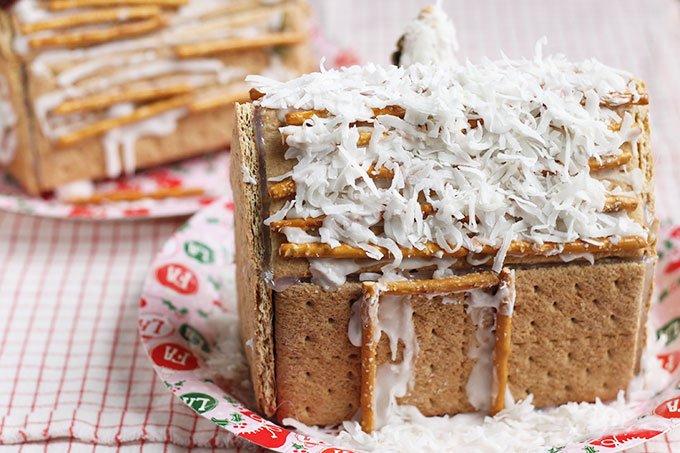
Toppings for Easy Gingerbread Houses
We like to use these toppings for our houses—and the kids usually nibble as they go!:
- Pretzel sticks
- Chex cereal (they make great windows)
- Mini marshmallows
- Shredded coconut (perfect for snow)
- Dried cranberries
- Yogurt covered raisins
- Slivered almonds (they make great shingles!)
- Pumpkin seeds
- Banana chips
TIP: You can also add a sugar cone to each house as a tree and decorate that too.

Royal Icing for Graham Cracker Houses
You will need to make some easy icing so the kids have a “glue” to hold their toppings to the house. I use powdered sugar and milk—so easy! Simply mix them together until you have a stiff, but still stirable icing. If you want to use icing to hold the house together, you can do that, though know it takes a few minutes (like 5-10) for it to set, so you’ll have to sit and hold the house in place while you wait. (This is why I use glue!)
TIP: I like to put the icing for the toppings into a zip top storage bag so the kids can pipe the icing on. Cut off a small part of the corner, like 1/4-inch, right when the kids are ready to decorate. The icing will stay fresh in a sealed storage bag if you want to make it the day before.
Tips for Making the Best Graham Cracker Houses
- Plan to make the houses yourself or with the help of an older child.
- You can make the houses up to a few days ahead of time if desired.
- Make each house on top of a paper plate so it’s easy to transport when completed.
- Put out an assortment of toppings so the kids can pick and choose what they want on their house.
- If doing this as a playdate, request that each child bring two toppings to contribute.
- Expect the table you do this project on to get very sticky.
- Expect the floor under the table to be covered with crumbs.
- The houses will last at room temperature for a few weeks. The kids can eat their toppings if they want to, but this is more an idea to be used as a decoration.
I’d love to hear your feedback if you try this out with your kids, so please comment below to share!

Easy Graham Cracker Houses
Description
Each batch of icing will make enough icing for 2-3 houses.
Ingredients
- Graham crackers (you’ll need 7 full size sheets for each house)
- Toppings including: Pretzel sticks, Chex cereal (they make great windows), mini marshmallows, shredded coconut (perfect for snow), dried cranberries, yogurt covered raisins, slivered almonds (they make great shingles), pumpkin seeds, banana chips, sugar cones
- 2 lb (32 oz) bag powdered sugar
- 2/3–3/4 cup milk
Instructions
- Heat up the glue gun and stick. Make a box starting with one long graham cracker as your base. Glue on sides and a top.
- Add two long graham crackers to make a pointed roof.
- Cut 2 square graham crackers (either break a full size one in half or pick up a box of the square graham crackers) into triangles with a serrated knife.
- Glue triangles to the ends to finish.
- To make the Royal Icing: Stir together the powdered sugar and milk, starting with the lower amount, in a very large bowl. Add milk, one tablespoon at a time, as needed to make a very stiff, but uniform icing. (You want it to be stiff so it doesn’t drip out of the bags too quickly. You should be able to stir it together, but it should require a little bit of muscle.)
- Divide the icing into 2-3 quart size storage bags. Remove air and seal.
- When ready to decorate the houses, snip off one bottom corner from each bag to make a very small opening.
- Decorate with assorted toppings!
Notes
Plan to make the houses yourself or with the help of an older child.
You can make the houses up to a few days ahead of time if desired.
Make each house on top of a paper plate so it’s easy to transport when completed.
Put out an assortment of toppings so the kids can pick and choose what they want on their house.
If doing this as a playdate, request that each child bring two toppings to contribute.
Expect the table you do this project on to get very sticky.
Expect the floor under the table to be covered with crumbs.
The houses will last at room temperature for a few weeks. The kids can eat their toppings if they want to, but this is more an idea to be used as a decoration.
[ad_2]
Source link